
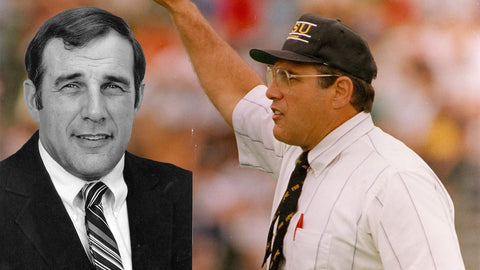
This article is recreated from the 1987 United States Lacrosse Coaches Association Clinic that I attended during my time at Radford University. My dad introduced me to coach Runk at a summer camp I was working. They lived in Highlandtown ("the neighborhood"), attended Patterson HS and played together for the Maryland Lacrosse Club. After meeting coach Runk, I was struck at how much of a sincerely nice person he was and relayed that to my dad. He laughed and said "well, he was a madman on the field and I was glad he was my defender". Craig Sr. was the goalie for MLC at the time.
Coach Runk always had a plan and, as you will see, a keen sense of humor. My priority at the '87 clinic was to attend the Towson "Tough" Defense talk as I prepared for my 2nd year as a D1 head coach nearly 35 years ago!

Carl Runk
The Towson "Tough" Defense
A Phase of the Team Defense Concept
Our philosophy, defensively speaking, at Towson State University became more of a reality out of necessity then from the total plan. Our decision to implement defense as a priority in our game plan was made on a home trip from North Carolina State University a few years back. Both teams contributed to a score that set an NCAA record in Division I lacrosse, the score being 29 to 19. Unfortunately, Towson was on the short end. To this day, I still believe our goalie played a good game. A fact that will attest to my feelings was the scene of our goalie being carried off the field on the shoulders of over half of the celebrating NC State team. Ironically, it was that year North Carolina State dropped lacrosse. That decision may have come about as a result of the electrical damage done to the scoreboard and the whiplash lawsuit brought on by their goalie. Since there has been a change in the athletic administration at State, we will never know. It was on the bus trip home that my thoughts were concerned with the possibility of another game as such resulting surely in my hitchhiking north on I 95! I had finalized that my chances for success in lacrosse were narrowed down to two options; a lobotomy or developing a defensive edge. Since I was medically informed that there was no need for duplication I decided on the latter.
During my formidable years, I often would contact the late Howdy Meyers when his great Hofstra team was in town for a contest to discuss defensive philosophy. Though busy preparing an upcoming game plan, he always seemed to have time to answer and discuss any questions I might have. The mere thought that he had the courage to be somewhat different always intrigued me. It was at that time I became interested in developing a defensive system with different fronts. Our decision to apply the multi defensive scheme versus the traditional man to man was encouraged by the thought that the defense be placed in an aggressive position, showing flexibility, rather than the basic man-to-man coverage. It was important that our defense be given an opportunity to take the office, so to speak, with a variety of looks, which would force adjustments to be made in a short period of time by the opposing team, whether it be during the weekly practice and or during the game. This would give us the defensive edge.

The Towson "Tough" Defense
A. The Towson "Tough" defense is a sound front designed to give the opposition a different look while enabling the defense an opportunity to accomplish the following goals:
B. Like most defenses, the "Tough" defense is a change of pace front and could be most effective if used as such as our philosophy on defense dictates different looks in order to be successful, the "tough" seems to blend in very smoothly. The following illustrated breakdown will assist in understanding the basic principles applied to this defense.
- Pressure the ball.
- Be in a position to back up.
- Take away individual play.
- Be in a position to control the ball after a shot.
- Afford the defense an awareness of the fast break.
- Force the office out of its offense of strategy.
- Deny a pass to adjacent players.
- Award the double-team at any time.
- Eliminate designated offensive players.
- Force re-direction on passes.

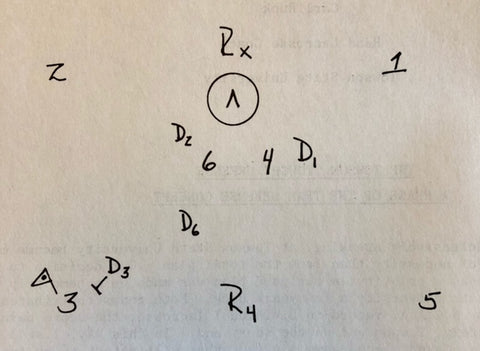
- D3 (Force), plays the ball one player position to the inside. D6 (Backer) aligns himself between D3 and the goal on an established arc, approximately 5 yards out from the crease. He is the Backer and supports the Force man. His backing position is shown by the letters on the diagram.
- D2 (Strong side support) plays a convenient wing position supporting The onside crease along with D6 and placing himself in a position to cover the #2 area. If needed, he must be aware that if #3 passes to #2 he would then become the Force-man.
- D1 (Weak side support) gives backside support to decrease but not in a flat manner. He must move up field a few yards, staying in the diagonal passing lane between #3 and #1. He becomes the next rotation to the pressure the ball on an onside pass (#3 to #5). He should be aware not to get caught on a low crease.

- D3 drops into the crease area, becoming Weak side support man and assumes the same responsibility D1 had when #3 had the ball.
- D1 becomes the Force and quickly slides out to cover #1.
- D6, as the Backer, slides from the B position to the D position assuming the same responsibilities.
- D2 slides across the crease and again becomes the Strong side support man playing in the exact manner as when #3 had the ball.

- D2 moves from Strong side support to the Force position when #1 receives the ball from #5.
- D6 moves from the D position to the E back her position being ready to back up and also being totally aware of the vulnerability of feed to his area a.
- D1 converts from the Force man at #5 to Strong side support approximately at the E position vacated by D6.
- D3 plays a Weak side support position at approximately the E area. D3 drops down to the offside pipe proximity and, like D6, he must be cognizant of the vulnerability of his area for feeds. He should also play in the Weak side passing lane position.

#1 passes to #2
- D3 goes from the Weak side support area to the Force at the #2 position.
- D2 becomes the Weak side man playing basically the same position as D3, only at the E position.
- D6 slides from the E position across the crease to the a Backer position, keeping in mind the importance of his Strong side crease responsibilities.
- D1 slides from the D support position over to the B support position being aware of the cutters and anticipating a pass from #2 to #3.

#2 passes to #3
- D1 becomes the Force man at the #3 position.
- D6 slides from the Backer A position to the Backer B position.
- D2 becomes Weak side support going from offside pipe to D proximity.
- D3 goes from the Force at the #2 position to Strong side support.
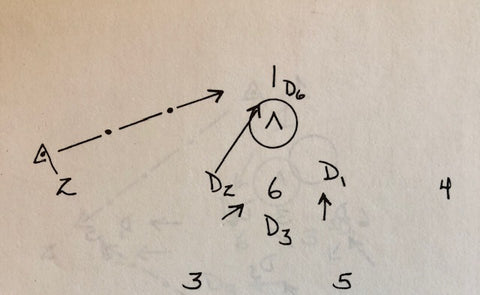
As the Triangle & One has completed a full rotation versus the 2-2-2, the responsibility will remain the same for all defensive players if ball movement continues.

Triangle & One Versus the 2-1-3 Offense
D. The triangle & one defense will remain the same versus the 2-1-3 offense. The #4 position player will not change the defensive strategy because of the support of the "Rover 4" man who will play that any number of ways. D6, however, will change his backer position to a C position when #4 has the ball. D2 & D1 will balance out while D3 has an opportunity to anticipate his next move.

Triangle & One Versus the 1-3-2 Offense
E. The triangle and one coverage is identical to the same coverage versus a 2-1-3 and 2-2-2 formation while the ball is out front at the 3 and 4 areas. There is a slight alteration when the ball is passed from the 3 position to the 2 position.
- D1 becomes the Force man.
- D6 dropped to an a position and must be aware of the vulnerability to his left is number six should pop out.
- D3 has to drop in as quickly as possible to support D6, cutting off the high post and pop-out move.
- D2 supports from the outside wing area, should not be flat and must support the crease.
One man Behind Principle
Any time only one player is behind the goal at point, the crease backer will be called on to play the Force position in order to maintain balance in the total defense. Every defensive player must be totally aware that this is a time of transition when the defense can be vulnerable.
- D6 becomes the force at the point position in a 132 or 141 formation. D6 should play the ball and not think take away but harass, read eyes, and try to block any passes.
- D2, once the pass is made, must give a supreme effort to get back into support the crease.
- D1 will play an offside crease position supporting inside out.
- D3, because of the void left by D6, must eliminate any threat to the onside crease.
- D3 must drive hard to the crease, and when D2 has returned to support (and only when he returns) D3 will slide out to a high crease area. It is important to mention at this time that the defense will depend on the goalie to help support the middle crease area by placing his stick in a high position helping to discourage any passes to that area.

Triangle & One Versus the 1-4-1 Formation
F. The "one man behind principle" applies here also. The ball starts at the 4 position. D3 becomes the Force man, plays good position and does not try to overplay. Balance is needed here.

#4 passes to #5
- D1 slides to five and becomes the force man. He doesn’t over play and anticipate the next pass.
- D6 drops in to the E backer position being aware of the crease and pop-outs. He must always anticipate the next pass.
- D3 moves quickly to the onside high post position supporting the crease with D6.
- D2 gives offside crease support.

#5 passes to #1
- All defenseman should support the crease and then balance out.
- D2 holds the outside crease position.
- D3 drives hard to the area vacated by D6 and once D1 returns, he should bounce out.
- D1 gets back to the crease quickly to release D3.
- D6 slides from the E backer to the force behind at point reading the offense all the way.
- Goalie should again hold his stick high, trying to discourage all passes to the crease.

#1 passes to #2
It is vital to have support on the crease at this time!
- D2 slides to cover #2. He must be alert to help discourage any feeds or passes to the crease, especially the high crease area.
- D3 must support the onside crease from the inside out. He will slide up when D6 has returned.
- D6 moves quickly to a backer position, onside.
- D1 should support the offside crease.

#2 passes to #4
- D3 becomes the Force man while the support people and backer align in the previously stated position.


[Diagrams 15 and 16] Rover X (RX) and Rover 4 (R4) Responsibilities
G. RX on a tough regular versus two men behind will play a position between both attackmen. He is to discourage passing between the two players and must be aware that he is to back up any shots. RX is given the freedom to double-team anytime he feels the opportunity is available. The example given, diagram #15, shows #1 driving to the goal and not being in a position to see RX. At this time our RX would be available to double-team. He will also be in a position to double or to deny either attackmen the ball on an "alert" car. He has the authority to call off the Force man when the ball is being passed behind.
RX versus one man behind will align himself in a position of advantage either in front, behind, or to the onside of #1 behind. He again is responsible for ball control on a shot, deny and the freedom to double if the situation deems it necessary.
R4 responsibilities are almost identical in the front position. On a two front he will station himself between the two middies. He also tries to discourage passes across the front and is given the opportunity to double when he sees fit. On any shot he releases quickly to initiate the fast break. On an alert call, R4 can assist in doubling or denying.

Both Rover X and Rover 4 are in a position to place tremendous strain on opposing players while affording their defenseman an opportunity to place themselves in a comfortable defensive scheme.
Conclusion
When applying the "tough" defense in total, the progression we feel most effective is to defense first the 2-2-2 Offense with both rovers in their primary positions. It is important that the triangle and one developed a feeling of confidence and assurance at this time. In this way the triangle and one and both RX and R4 are in a position to see how support can be given to each other immediately by means of communication. It is also a period when they work together as a unit and search, as a group, for the proper timing needed in execution. Once they have become familiar with the responsibilities, we would advance to the 1-3-2 formation and explain how the force man, responsible for the #1 point-man behind, could 1.) be released of his force duties, balance out and give support to the crease, 2.) double-team or 3.) use the face technique (where the backer relinquishes is basic responsibilities to another player and "face guards" the offensive player(s) on the onside crease). Only when our personnel feels comfortable with their execution will we progress to the 1-4-1 formation. This formation would include the R4 who also has the opportunity to execute in the same manner as RX did with one behind.
The Towson "Tough" defense, as stated before, is a change of pace front that can be a lot of fun for players, giving the defense a commanding edge and gaining momentum along with placing them in a position of defensive control.
 1968 University of Arizona team, coached by future Towson legend Carl Runk
Craig Sr. tells a heart-warming story about officiating Coach Runk's games
Notes: All diagrams are Coach Runk's originals. I took some text formatting liberties that were not available on the original typewritter production, for clarity. The cover photo is from the Baltimore Sun. All other photos linked to source.
Lastly, please share your Coach Runk stories in the comments. Thanks for visiting. -Craig Jr.